Showing posts with label cards. Show all posts

Friday, April 9, 2010

Crumpled Paper Technique...

I love the look of distressed paper! That shabby chic, vintage look where the paper appears well worn and resembles fabric is so pretty. Of course, there are many paper distressing techniques out there to choose from that will give paper an aged look but crumpled paper is one of my favorite techniques and it's been making a comeback with scrapbooking and paper crafting recently. It's one of those techniques that is super simple to do and isn't at all costly. And you can use it for just about anything... to create backgrounds or to make your own embellishments like I did with the card below.

In the past, I remember using this technique on cardstock but now I find I use it much more with patterned paper. I especially love using this technique with vibrantly colored patterned paper set up against crisp white cardstock for contrast. For this card, the My Mind's Eye Quite Contrary collection of Jack & Jill papers and stickers were exactly what I had in mind and they happen to be some new papers I've been sooo looking forward to using.
\
I started with cutting the checkered background paper and punching and cutting the circles first. Next, I inked the edges and then softened these pieces by lightly misting both sides with a small spray bottle of water. You can crumple paper dry if you prefer but I've found it's easier using the water. When the paper was wet, I crumpled the pieces gently and unfolded them carefully to avoid too much tearing. I repeated this several times. To dry the paper, I had a pair of tweezers to hold each piece as I used a heat gun to dry the paper. The wet paper can also be ironed or simply air dried if you have time.

Note: the water will shrink the paper slightly but I think the imperfection adds to the charm.

I stitched on the checkered piece of paper. To create the flower I punched and cut several circles (some trimmed with decorative scissors) that I then layered them on top of each other once they were distressed and dry.

Whether you're new to scrapbooking or an experienced veteran I hope you enjoyed the post today!


Supplies:
My Minds Eye - Jack & Jill patterned paper; Jack & Jill How Sweet It Is and Life Is Good Accessory Sheets; Lush - Green Rhinestones
Tools:
Fiskars Americas- Round 'n Round Squeeze Punches; Circle Shape Template & Ultra ShapExpress Tool; Scallop Paper Edgers
Glue Arts - Mini Adhesive Squares

Tuesday, January 19, 2010

Get those rub-ons off the shelf...

Do you have too many rub-on's in your stash?

Do you buy beautiful rub-ons and hoard them for "something special" only to find out a year later that you have even more beautiful rub-ons waiting to be used and the pile hasn't gotten any smaller?

I'm guilty of both questions. Yes, I admit it - I'm a rub-on hoarder.

Earlier this month I spent one morning pulling rub ons off the craft shelf and decided to create with them. Something! So I cut several pieces of kraft paper in the same size and decided to use the rub ons - somehow - on the kraft paper and make some cards.

Here's what I came up with.


Supplies: Rub Ons and Patterned Paper- My Mind's Eye, Card- Making Memories; Chipboard- 7Gypsies; Glimmer Paint: Tattered Angels; Kraft Cardstock - Stampin' Up; Alpha Stickers: Making Memories


Supplies: Rub Ons- Hambly and Basic Grey; Patterned Paper - October Afternoon; Vintage Image- Crafty Secrets; Cardstock- Stampin' Up (Kraft), Bazzill (red); Pearls- Kaisercraft; Alpha Stickers: Making Memories


Supplies: Rub Ons- Creative Imaginations; Patterned Paper: My Mind's Eye; Pearls - K & Co; Alpha Stickers: Making Memories, Cardstock - Stampin' Up (Kraft); Other - buttons.

I hope this gives you some ideas to pull out your rub ons (at least the ones that have almost passed their expiration date). If you create anything after reading this blog, I'd love to see - so post a link in the comments section.

Have a wonderfully crafty week and thanks for stopping by.

~melanie~

Tuesday, November 17, 2009

A Christmas PHOTO CARD!!

Instead of using a traditional 'family' Christmas photo this year, try looking around at your holiday decorations for a fun spin on the Photo Christmas Card!

My home is full of primitive decorations (starting on the day after Thanksgiving...I can't wait!!). I have this antique trencher (wooden bowl) on my dining room table, that I fill with primitive boughs of evergreens with pinecones and antiqued jingle bells. I added these adorable primitive stuffed gingerbread men (I got this idea at my FAVORITE store ever... Things Made Wonderful in Rhode Island).

Last year, as I was walking around the house taking photos of some of the holiday decor, I decided to take a photo of these 2 guys...and see what I could come up with using this adorable photo.

It was so easy to come up with the idea of incorporating the photo into a 'From Both of Us' Christmas Card!

I simply created my card base, added a distressed patterned paper for the background, added the photo and embellished! Easy and (I think) just so darn cute!

So, this year, after you've finished decorating your home for the holidays, grab your camera and see what inspires YOU to create a card! A couple of snowmen standing side by side would make a cute 'From Both of Us' card. Or assemble several figurines (angels, snowmen, elves, etc) to create a family photo!! Have fun and Happy Holidays!

Title: From Both of Us 5-1/2" X 5-1/2"

Supplies:
Cardstock: The Cardstock Stack, Die Cuts With a View
Patterned paper: Dreams; Believe Set, BoBunny
Die cuts: FaLaLa; Die-cut Journaling Stickers, Making Memories
Chipboard: Stars; Chipboard Shapes, Making Memories
Button: Apple Green; All Stuck Up Buttons, BoBunny
Brad: Apple Green; All Stuck Up Brads, BoBunny
Flower: The Bitty Bag, Prima Marketing
Computer font: 2Peas YoYo, TwoPeasinaBucket.com
Photo corners: Canson
Photo: Dee Gallimore-Perry
Jute
Sandpaper

Dee

Monday, December 8, 2008

Coloring with Pastels is a Hoot!

I know I'm probably the last person in the scrapbook world to actually do this, but I just recently discoverd how fun it is to color stamped images with pastel chalk. What is so unbelievable is that I have owned pastel chalks for about 3 years. I have tried to color things in the past, but using Q-tip type applicators never did the trick for me. In my previous crafty-life, I was an avid watercolorist, and loved the fine tips on expensive watercolor brushes. I could get color in the tiniest places with one of those brushes. So - I quickly abandoned using chalks. That is until recently.

I recently got my hands on a Stampin Up blender pen, and with a little instruction, I learned that you can use the blender pen just like a watercolor brush. Boy, was I excited to try this. Now, the technique doesn't look exactly like watercolor, and the chalk technique gives an imperfect look, but with all the distressing I do - it suits me just fine.

I made some step by step photos to show you how easy it is. Even tho most of you probably already know this, maybe you can just smile and say "Atta girl" as you read.

You will need:
-Chalk Pallete
-Smooth Cardstock
-Stamps
-Dye Ink
-Stampin Up Blender Pen


Stamp your image on cardstock.


To color, dip the end of the blender pen into chalk cake.


Apply directly to your stamped image. Apply more chalk if you want the color to be more saturated. For less color, scribble your blender pen on scrap paper until desired tint is achieved.


To clean the tip before changing colors, scribble on scrap paper until pen no longer shows color when used.

That's it!! This is so simple and gives the effect of watercolor quick and easy.

I trimmed my stamped image and used it on this card.


Supplies: Owl Together Now Stamp Set; Very Vanilla and Craft Cardstock, Bella Rose Designer Patterned Papers, Chocolate Chip and Riding Hood Red Ink, Stampin Pastels, Baja Breeze Striped Grosgrain Ribbon, Blender Pen (All from Stampin Up). Other Supplies: Button, Candle Wicking Thread, and Martha Stewart Border Punch

And, well, I couldn't stop creating. I had to make another card.


Supplies: Owl Together Now Stamp Set; Very Vanilla Cardstock, Bella Rose Designer Patterned Papers, Chocolate Chip and Old Olive Ink, Stampin Pastels, Blender Pen (All from Stampin Up). Other Supplies: Button, Jute, Martha Stewart Border Punch, Worldwin Cardstock, Cricut Die Cut Tag

What I like about this technique is the ability to color my images but not have them screaming "look at me". I love markers, too, but sometimes I want the color to be more subtle without having to purchase all the various colors and hues in the marker world. I like the ability to apply the color soft and muted..... pastel and chalky - just like their name.

I hope you have been inspired today. For those of you going "You are just now learning that technique" - well, maybe you have some secrets you can share with me. I'll all ears. Have a wonderful day and thanks for stopping by.
Photobucket

Thursday, November 6, 2008

time to be thankful

Fall is here and after a busy summer it's always nice to finally sit down & relax a bit. The weather is cooler, the days are shorter and in just a few weeks we will be enjoying a wonderful Thanksgiving meal.

It's also a great time to be thankful and express our gratitude to family & friends! Why not take a moment this month and send your family & friends a little note of gratitude? Pull out those supplies, let your kids join in and just write a simple, heartfelt note thanking someone. Let them know how thankful you are that they are in your life!

Here's some great quotes to motivate you, along with some examples of a few easy cards that you can do.

Silent gratitude isn't much use to anyone. ~G.B. Stern

We can only be said to be alive in those moments when our hearts are conscious of our treasures. ~Thornton Wilder

Thanksgiving, after all, is a word of action. ~W.J. Cameron

He who thanks but with the lips Thanks but in part; The full, the true Thanksgiving Comes from the heart. ~J.A. Shedd

Feeling gratitude and not expressing it is like wrapping a present and not giving it. ~William Arthur Ward

Supplies used:
Pattern Paper: Paper Salon Spice Foil Falling Leaves
Rub-ons: Paper Salon Spice
Sticker: Paper Salon Spice
Other: Pop-up Dots


Supplies used:
Cardstock: Bazzill
Stamps: Inque Boutique, Heidi Swapp
Chalk Ink: Colorbox, Paper Salon
Ribbon: Source unknown
Button: Autumn Leaves
Decorative Scissor: Fiskars


Supplies used:
Cardstock: Bazzill Basics
Pattern Paper: Bo Bunny Autumn Wood
Stamps: Paper Trey Ink Holiday Tags, Paper Salon Fall Frolic
Ink: Ranger Distress
Lace: Source unknown
Die-cut: Quickutz Scallop Circle
Tools: Provocraft Cuttlebug
Punch: EK Success large circle, Creative Memories corner rounder


Us gals here at The Pursuit of CraftYness blog are very thankful for all of you! So I put together a little giveaway as a thank you.


All you need to do is post a comment right here and tell me who you are thankful for or who you plan on sending cards to over the next few weeks. And like always, if you post some of those cards...please share your links with us. We always enjoy seeing what our readers are doing!

You have until midnight Saturday, November 8th to post your comment here (one per person please). I will pull a name and announce the winner no later than Monday the 10th. Please post your email address so that I can contact you and get your package out right away!

THANK YOU for all your kind words, sharing your amazing projects and hanging out with us here!


Monday, October 27, 2008

Think Pink!

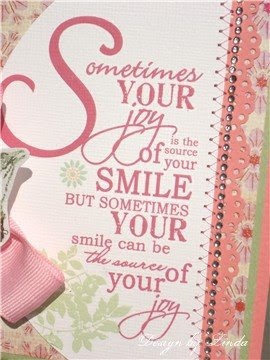
In honor of October being Breast Cancer Awareness month, I thought it would be fun to create a pink, girly kind of card that would be great for sharing with a friend.
I tried to pull out all of the "girly" kinds of embellishments I could think of to make this a joy to give and to receive.
This wonderful phrase is a rub-on by My Mind's eye. I cut the paper that holds it with a circle shape so I could add this to the front of my card. The scallop border is a Martha Stewart border punch and I added a line of machine sewing and some tiny rhinestones.
The bird on the branch is also a rub-on. I rubbed it onto white cardstock so that I could then cut that shape out to use as an accent. The swirls are accented with glitter. I used Glitter Fabric Dimensional paint from Tulip. I like this glitter because it gives a subtle amount of bling while still letting you see what is underneath. A big bow was added to the card with a brad and the bird accent was glued over that.
Thanks for visiting the Pursuit of CraftYness blog today, Linda (lbpost)

YOUR JOY card
Materials list:
Solid Cardstock - Prism
Patterned papers – My Mind’s Eye and Bo Bunny Press
Rub-on phrase and bird – My Mind’s Eye
Circle template – Coluzzle
Glitter Fabric Dimensional Paint – Tulip
Ribbon
Machine Sewing
Border punch – Martha Stewart

Monday, September 29, 2008

Chipboard and Maya Mists

I've recently aquired some new Maya Mists, a new colouring medium by Maya Road. I particularly like using them to colour my chipboard pieces. The mists are very easy to use, the chipboard is dry within minutes and the coloured surface has a lovely matt finish.

Here's how to use the Mists
Lay out the chipboard you wish to use. Place a large piece of paper under your chipboard as the mist does cover a large area when sprayed.

A couple of sprays will be enough to cover the chipboard. Leave to dry.

In a couple of minutes your chipboard is dry for you to continue with your project.


Maya Mists can also be used to colour cardstock or paper, in this case the base of my card. A couple of sprays was sufficient to cover my card giving it a "spritzed" look.


I further enhanced the my chipboard pieces using my souffle pens to add a little glitter and glaze.


To finish off my card I glued the chipboard pieces to the card. The "icing" section was raised slightly with a foam adhesive. And I finished my cupcake with a little flower decoration on top.


This was a very simple and quick card to put together. The Maya Mists enabled me to colour my chipboard easily and I was able to assemble my card in less than 10 minutes.

Materials:

Thanks for visiting. Hope you have a great day.

Cheers

Fiona

Thursday, September 18, 2008

The Art of Stamping Flowers

I recently found some really fun and interesting stamps at Kitchen Sink Stamps. Many of her stamps are referred to as "3-step" and in essence you are "painting" a flower or other design as you go. BUT - there is a challenge in figuring out what stamp pads and what colors to use to create the different layers. I wanted to not only show you the flower and leaves that I stamped but I wanted to show you the pads that I used. Mostly because you can see from the photo below that I mixed up the different companies of stamp pads in my choices.
These are the actual pads that I used for this flower. When you are stamping these layers or steps, you have to find colors that are going to get stronger or produce contrast to the layers. I found that hard to do with just keeping with one company or one kind of stamp pad. I have even mixed in the Fluid Chalk stamp pad and the ColorBox, Pigment ones. Here is a great example of not being afraid to experiment and play! You should see my pile of rejects!!! They all seem to work together and one thing that I really like is that as you creation sits for a minute, the colors seem to melt together. So if you aren't happy with your initial image, leave it for a little bit.
In the photo above, you can see the layers to this particular flower. For some reason I didn't stamp them in order so you have to follow the numbers that I put on each one. And, for my flower I used the Treasures cardstock by Worldwin and you see the texture in the paper that gave a "canvas" look to my flower.
Layer #1 - Vivid Yellow
Layer #2 - Marvy Brilliant Yellow
Layer #3 - Memento Tangelo
Layer #4 - Distress Ink - Vintage Photo
Each set of stamps from Kitchen Sinks stamps comes with a number of images in each set so you can see here one of the leaf choices. My background is an embossing plate by Provo Craft and that is highlighted slightly by rubbing over it with Fluid Chalk stamp pads.
After my flowers and leaves were stamped, I coated all of my cut out images with Inkssentials Crackle Accents. As this liquid dries, it cracks and I added a little emphasis to the cracks on the flower by patting it with a brown Fluid Chalk stamp pad. The brown ink "goes down into" the cracks to bring them out a little. I didn't add anything to the leaves.
Thanks for visiting Pursuit Of CraftYness today! The group of crafters here post yummy projects for your viewing pleasure and hopefully we have inspired you to try something new!!! Linda
CRACKLE DAISY card
Materials list:
Cardstock
Patterned paper – Wallflower/Times Nouveau Collection/Graphic 45
Cuttlebug embossing plate – Provo Craft
Fluid Chalk stamp pads – Clearsnap
3-Step Daisy stamp set – Kitchen Sink Stamps
Marvy stamp pad
Vivid stamp pad
Memento Stamp pads
Inkssentials Crackle Accents – Ranger
Ribbon

Tuesday, August 19, 2008

"stamping" with your computer

First off, I have to say that I love my stamps. There's just something about opening up a drawer full and digging through them to find just what you need. But not too long ago I found myself loving all the digital art & doodles too. How cool to be able to "stamp" on my digital layouts and all available with a quick download.

If your like me and enjoy digital doodles or word art and even clip art then why not print them out and use them on your cards and tags too? Just think...a stamp in any size you want! It's as easy as opening up an image you like, sizing it and then simply printing it out on the paper you want.

On this card, I printed out the image from Talking in Circles by Sande Krieger. I just opened it in Photoshop Elements, sized it to fit my card front and then printed it out. I colored in the image with Prismacolor Pencils and a blender pencil....just like I would with a stamp!

supplies used:
Cardstock: Bazzill Basics, Eames
Digital Image: Talking in Circles by Sande Krieger (twopeasinabucket.com)
Colored Pencils & Blender: Prismacolor
Jewels: Carolees Creations Jewel Droplets
Ribbon: Creative Imaginations, Making Memories
Die: Spellbinders Nestabilites
Tool: Provo Craft Cuttlebug
Software: Photoshop Elements 3.0


On my second card I printed out a beautiful doodle created by Leah Riordan of Mommyish Designs. (seems my info is old and I couldn't find a current blog or site she sells at. If anyone knows where to find her, let me know so I can link it up. Thanks!) After printing this one out, I colored it in with Prismacolor Pencils and Stickles glitter.

supplies used:
Cardstock: Bazzill Basics
Pattern Paper: KI Memories Colorful
Quote Sticker: KI Memories Colorful
Digital Image: Leah Riordan of Mommyish Designs
Pencils: Prismacolor
Glittler: Ranger Stickles
Other: Baby oil for coloring
Software: Photoshop Elements 3.0


For this one I used a clip art image from Dover Publications. You can purchase their books that come with CD's and there are tons to choose from. If you sign up for their newsletter you can get a link to free clip art samples each week. That's how I got the beautiful rose image. It's a great way to try out their clip art. I wanted to test out my printer ink with various types of coloring to see if it would bleed. I used Prismacolor Watercolor Pencils and my water brush to color in the rose. My printer ink did bleed slightly, but honestly not enough to bother me. It seemed to have more bleeding where I colored lighter but I don't think it was anymore than certain dye inks.

supplies used:
Cardstock: Bazzill Basics, Eames
Pattern Paper: Creative Imaginations
Clip art: Dover Publications
Watercolor Pencils: Prismacolor
Waterbrush: EK Success
Stamp: Just Rite Stampers Monogram Circle
Rub-on: Making Memories
Software: Photoshop Elements 3.0


For the last one I did a walnut stain. The bird image is from Digicraftshop and after resizing it, I printed it just like above. But this time I inked it up with some Distress Walnut Stain, misted it with water and then used my heat tool to "move" the wet ink around to get the stained look. I was very surprised at how well my printer ink held up because I did quite a bit of misting! The image did soften a bit from the water, but I think it just adds to the aged feel.

supplies used:
Cardstock: Eames
Pattern Paper: Bo Bunny Romance
Clip art: Victorian Bird (digicraftshop.com)
Ink: Ranger Art Distress Walnut Stain
Mister: Judikins
Heat tool: Marvy Uchida
Die: Spellbinders Nestabilites
Tool: Provo Craft Cuttlebug

Software: Photoshop Elements 3.0

You can find lots of available clip art on the web along with many talented digital artists. So even though I love getting my hands inky with traditional stamps, I found that I love using my digital "stamps" too!

Sunday, August 17, 2008

sewing+paper=cardmaking

Hello, Fiona here. For this post I thought I'd share the invitations I made for my daughter's upcoming birthday.

When I'm making invitations I create a card making "production line" of sorts. I break the card making process down into smaller tasks. The little jobs needed to create these invitation were as follows:
  1. I printed the party details on one side of the card and the party line (em+friends+13=party time) on the other side of the card.
  2. Then I took all the cards and folded them. This may seem like a simple job, but when there's 20 plus cards to be made, I made this a separate little job and this was a great job to do while watching the Olympics on TV one night.
  3. Next I cut thin strips of paper and had the different coloured strips in their own bundle.
  4. Sewing time! I set myself up at my sewing machine with my pile of cards next to me, my bundles of paper strips and sewed the strips across the cards. I would sew several cards at one time without breaking my sewing. As I came to the end of one card, I would just feed the next card through the sewing machine. This makes the sewing task much quicker than stopping after sewing each individual strip to the card. You then just snip the thread in between the cards ready for the next strips to be sewn. My daughter, who is enjoying her sewing at the moment, shared the sewing task with me on these cards.
And here we have the invitations...


And while I was making the invitations, I made the thank you cards as well.


Better get back to party preparations!

Thanks for visiting our blog, and I hope you have a great crafty week.

Cheers

Fiona x

Friday, August 1, 2008

Cuttlebug Quick and Easy Cards

Okay - so I've had my Cuttlebug for almost a full year and I have to admit, I haven't fully experimented with it like I should. Admit it - how many of you have the Cuttlebug but don't use it as often as you intended to? I hope after you read this post, you're inspired to get it out and play.

I recently bought some new folders for my Cuttlebug wanted to try them out. I decided to challenge myself to make some cards with limited supplies. Cuttlebug has some new combo sets out. They are a combination of embossing template along with a die cutting plate. I used the "With Gratitude" set for these cards. Believe me, they are quick and easy! And my supply list is very limited: cardstock only!


For added visual interest, I used colored cardstock with a white core, and a piece of sanding paper on the embossed images.

Supplies for all cards:
Cuttlebug Combo Set: With Gratitude
Cuttlebug Die Cut System
Cardstock: Bazzill Basics (2 sheets of white), 1 sheet of teal (Die Cuts with a View)
Sandpaper
Corner Rounder
Adhesive

To change things up a bit, I used a totally different embossing folder (Argyle) on one additional card and same die as used above.


I hope I've inspired you to dust off your Cuttlebug and make some cards. I had fun and am already imagining different color combinations to use on future sets.

Have a great Friday!!

Photobucket