Sunday, August 31, 2008

A little home decor...

Hope everyone is enjoying the holiday weekend and having an extra day off, I know I am!:0)

Today I thought I'd share a few projects that I made after being inspired by a piece of pattern paper. Ever see a piece of paper and think.. it's just too pretty to cut up? I do this all the time and love to cut out my favorite parts and make them into home decor pieces. That way you can admire them all year long. ;)

The first piece was inspired by a piece of Jenni Bowlin paper. I simply cut out the design I fell in love with (the bird) and embellised the wooden word (HOME).

Here's the paper:


And my project:


The next project started off as a paper mache box. I painted it white and then sanded and inked it. I cut designs out of the following papers from Webster's Pages:


And then decoupaged them to the outside of the box and added the little nest. Here's what I came up with:


Thanks for stopping by and have a great day. -Sherry :0)

Thursday, August 28, 2008

Stamping Week Continued

HI Everyone,

I hope you've been enjoying our projects this week. Have you pulled out those stamps yet and tried something new?

Today's post highlights a beautiful card set from Melanie. She used the
Crafy Secrets "Bird Lovers" set to make three cards. You can find this adorable stamp set here. As you can see they are all so different, yet beautiful. Stamp sets are very versatile.


As you can see, using one set produced three very unique cards.
Well, we hope you enjoyed our projects this week! Thanks so much for stopping by!
~Anabelle
Title: Dreams Have Wings
Designer: Melanie Douthit
Supplies:
Cardstock: Bazzill Basics
Patterned Paper: Basic Grey, My Mind's Eye
Stamps: Crafty Secrets (Bird Lovers)
Ink: Clearsnap
Ribbon: Maya Road
Other: Button, Trim
Ribbon: Crate Paper


Title: You Can Fly
Designer: Melanie Douthit
Supplies
Cardstock: Bazzill
Patterned Paper and Buttons: Crate Paper (Sweet Branch Collection)
Stamps: Crafty Secrets Bird Lovers
Ink: Close To My Heart


Title: This Song's For You
Designer: Melanie Douthit
Supplies:
Patterned Paper: Dream Street
Card: Making Memories Precut
Cardstock: Bazzill
Ink: Clearsnap
Stamps: Crafty Secrets Bird Lovers
Ribbon and Felt Flower: American Crafts
Chipboard Flower: Melissa Frances
Buttons: Lasting Impressions

Wednesday, August 27, 2008

More Stamping Projects

Today we'll start off with a couple of cards made by Julia. Julia says, "This card was inspired by an adorable card seen in the Spring/Summer Stampin Up catalog. I thought it showed a fun, easy way to use those smaller stamps! So here's my interpretation of it!"
Notice how she layered some of the stamped images to give the card more dimension.


Bo Bunny Double Dot Cardstock
Paper Salon School Stamps
Close To My Heart Ink Pads
Bo Bunny Double Dot Ribbon & Brad
Foam Adhesive Squares
Julia adds, "I then took that card that I made and used it now for another card's inpsiration! I always want to make Halloween cards to have at the ready and think this is definitely getting quite a jump on it!"


Heidi Grace Stripe paper
Close To My Heart Ink
Tsuknieko Glue Ink Pad
Stamenpdous Ultrafine Glitter
May Arts Ribbon
Googly Eyes
Stickles Black Diamond

This next project is from Jessica. She says, "I was inspired by a Hambly Studios overlay I worked with last week. I liked it so much that it was hard to cut into the darned thing and use it up! So, I decided to stamp some of my own! StazOn ink is vital to this project... regular pigment ink will not dry on a slick surface."


And finally, here is a layout that I (Anabelle) created. I used foam stamps and paint to stamp the alphabet in the background of the layout. I coated the stamp with paint and stamped it on a piece of scrap paper to get rid of the excess. Then I stamped it onto the page. Larger stamps work best when creating a background.


Well, that's it for today. I will be posting a few more projects on Friday, so be sure to check back. Thanks for stopping by! ~Anabelle

Monday, August 25, 2008

Stamping Week!

Hi Everyone,
This week is being devoted to stamping! We all love to stamp and thought we'd share some of our ideas with you. We could probably have a stamping YEAR, since there are so many wonderful techniques to do with it, but we settled on presenting you with some awesome projects to get you motivated.

This first one comes to you from Miki. How cute is this clock??? Miki says,
"I went kind of simple this time. But it's something I've wanted to do for a long time. I received this clock for Christmas last year. You're supposed to put photos in it, but I put stamped images in it instead. Thought it would make a fun, colorful clock for my scraproom. The silhouette stamps are some of my favorites! The only thing I wished was that the silver frame wasn't so shiny/smooth. I would have loved to have stamped some swirls in the corners and along the photos. But I would have made a mess with it since it's so slick. (in other words...I was too chicken to mess it up, LOL)

I used plain, old school watercolor to paint on the watercolor paper. Once they dried, I simply stamped the silhouette images with black ink and placed them in the clock."


Stamped Silhouette Clock by Miki Benedict
Supplies used:
Photo Clock: Melannco
Cardstock: Watercolor Paper
Stamps: See-D's Silhouettes
Ink: Black Versafine
Watercolors: Crayola
Other: Paintbrush
Watercolors

Next, we have gorgeous card from Linda. She says, "Both of my cards show creating my entire background with stamps and coloring mediums. The first one started out with solid white cardstock. I stamped the dictionary page stamp in black on the paper and then I sprayed that with the Mango Lemondade and the Strawberry Diaquiri Memories Mists. The flower was created the same way. The stamp is just an outline of the flower. It is colored to match my background piece with the same sprays.


The next card started out with solid white cardstock. I stamped the dot background stamp with black ink and I embossed it with black embossing powder and then colored that piece with the Pearlescent green and sprayed it with the Fully Purple Glimmer Mist.


LOTS OF HUGS card
Materials list:
Cardstock - Prism
Newspaper page stamp – Stampers Anonymous
Flower stamp – Paper Source
Tonic Paper Distresser
Clearsnap stamp pads
Memories Mists spray – Mango Lemondade and Strawberry Daiquiri/Stewart Superior
Brads – Creative Impressions
Fancy label – K&Co.
Clear Paper Glaze – Aleene’s®/Tulip
Greeting stamp – Hero Arts

THE ROAD TO A FRIENDS HOUSE card
Materials list:
Cardstock
Dot stamp – Stamp Camp
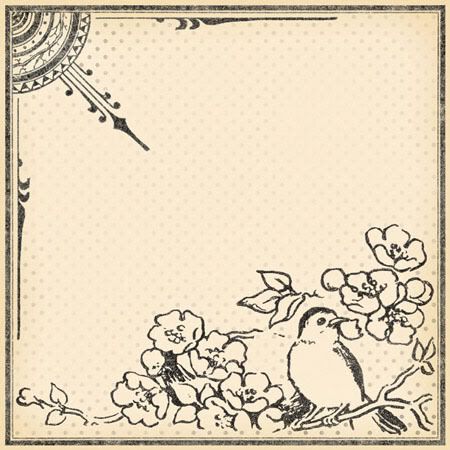
Bird stamp – Inkadinkadoo
Pearlescent Stargazers – USArtQuest
Glimmer Mist - Fully Purple/Tattered Angels
Fancy Label – K&Co.
ColorBox stamp pad – Clearsnap
Top Boss Black embossing powder – Clearsnap
Greeting stamp – A Muse Rubber Stamps

Be sure to stop back for more fun stamping ideas. I'll be posting again on Wednesday and Friday.
Thanks for stopping by, Anabelle

Friday, August 22, 2008

Big congrats to Anabelle! (and a little chipboard fun)

I am so excited to be able to announce that we have a 2009 Memory Makers Master apart of the Pursuit of Craftyness! Most of us would agree, that for this designer, it has been a long time coming!
In early 2005, I came across a layout by agomalley that caught my eye in the 2 peas gallery. I absolutely loved it. I viewed her gallery and fell in love with her style. The intricate details, bold yet sophisticated style, her gorgeous layouts; everything about her work screamed "majorly talented designer". Back then, I was working for Basic Grey and with her permission, I featured her as the "Eye Spy" column of the March 2005 newsletter. She then joined the paper salon team and I (and others on the Pursuit of Craftyness) are lucky enough to call her "friend" and have done so for quite some time! Having a long lasting friendship with this talented and sweet lady is a real blessing to me and all those that know and love her. I hope you will all join me in congratulating Anabelle O'Malley for winning 1 of only 10 spots in MMM Class of 2009!

Now for a little chipboard fun! I love finding a different use for something with an obvious purpose. Chipboard is one of those things that I have tons of fun. It's versatile, easily changed and durable enough to do some really unique projects.

This gift box is altered with BoBunny papers and Everlasting Keepsakes Chipboard. The box lid is simply wrapped just like a present and glued on the underside of the lid. The sides were measured and trimmed to fit. Each side has it's own polka dot color. This paper is one of my all time favorites.


Below, is a card is using a chipboard frame as the base of the card. The "e", photo corners and frame are all Everlasting Keepsakes chipboard. The pattern paper is Daisy D's. I just painted the frame blue and attached the backside of the card directly onto the frame. The size of this card is approximately 5x7".


Happy Holidays is a similar version of the card above. I was lucky enough to have it requested by CardMaker Magazine for last July's feature for "Christmas in July".

Thanks for stopping by the blog! Again, a HUGE, Gigantic CONGRATULATIONS to Anabelle!!! -Stace

Tuesday, August 19, 2008

"stamping" with your computer

First off, I have to say that I love my stamps. There's just something about opening up a drawer full and digging through them to find just what you need. But not too long ago I found myself loving all the digital art & doodles too. How cool to be able to "stamp" on my digital layouts and all available with a quick download.

If your like me and enjoy digital doodles or word art and even clip art then why not print them out and use them on your cards and tags too? Just think...a stamp in any size you want! It's as easy as opening up an image you like, sizing it and then simply printing it out on the paper you want.

On this card, I printed out the image from Talking in Circles by Sande Krieger. I just opened it in Photoshop Elements, sized it to fit my card front and then printed it out. I colored in the image with Prismacolor Pencils and a blender pencil....just like I would with a stamp!

supplies used:
Cardstock: Bazzill Basics, Eames
Digital Image: Talking in Circles by Sande Krieger (twopeasinabucket.com)
Colored Pencils & Blender: Prismacolor
Jewels: Carolees Creations Jewel Droplets
Ribbon: Creative Imaginations, Making Memories
Die: Spellbinders Nestabilites
Tool: Provo Craft Cuttlebug
Software: Photoshop Elements 3.0


On my second card I printed out a beautiful doodle created by Leah Riordan of Mommyish Designs. (seems my info is old and I couldn't find a current blog or site she sells at. If anyone knows where to find her, let me know so I can link it up. Thanks!) After printing this one out, I colored it in with Prismacolor Pencils and Stickles glitter.

supplies used:
Cardstock: Bazzill Basics
Pattern Paper: KI Memories Colorful
Quote Sticker: KI Memories Colorful
Digital Image: Leah Riordan of Mommyish Designs
Pencils: Prismacolor
Glittler: Ranger Stickles
Other: Baby oil for coloring
Software: Photoshop Elements 3.0


For this one I used a clip art image from Dover Publications. You can purchase their books that come with CD's and there are tons to choose from. If you sign up for their newsletter you can get a link to free clip art samples each week. That's how I got the beautiful rose image. It's a great way to try out their clip art. I wanted to test out my printer ink with various types of coloring to see if it would bleed. I used Prismacolor Watercolor Pencils and my water brush to color in the rose. My printer ink did bleed slightly, but honestly not enough to bother me. It seemed to have more bleeding where I colored lighter but I don't think it was anymore than certain dye inks.

supplies used:
Cardstock: Bazzill Basics, Eames
Pattern Paper: Creative Imaginations
Clip art: Dover Publications
Watercolor Pencils: Prismacolor
Waterbrush: EK Success
Stamp: Just Rite Stampers Monogram Circle
Rub-on: Making Memories
Software: Photoshop Elements 3.0


For the last one I did a walnut stain. The bird image is from Digicraftshop and after resizing it, I printed it just like above. But this time I inked it up with some Distress Walnut Stain, misted it with water and then used my heat tool to "move" the wet ink around to get the stained look. I was very surprised at how well my printer ink held up because I did quite a bit of misting! The image did soften a bit from the water, but I think it just adds to the aged feel.

supplies used:
Cardstock: Eames
Pattern Paper: Bo Bunny Romance
Clip art: Victorian Bird (digicraftshop.com)
Ink: Ranger Art Distress Walnut Stain
Mister: Judikins
Heat tool: Marvy Uchida
Die: Spellbinders Nestabilites
Tool: Provo Craft Cuttlebug

Software: Photoshop Elements 3.0

You can find lots of available clip art on the web along with many talented digital artists. So even though I love getting my hands inky with traditional stamps, I found that I love using my digital "stamps" too!

Sunday, August 17, 2008

sewing+paper=cardmaking

Hello, Fiona here. For this post I thought I'd share the invitations I made for my daughter's upcoming birthday.

When I'm making invitations I create a card making "production line" of sorts. I break the card making process down into smaller tasks. The little jobs needed to create these invitation were as follows:
  1. I printed the party details on one side of the card and the party line (em+friends+13=party time) on the other side of the card.
  2. Then I took all the cards and folded them. This may seem like a simple job, but when there's 20 plus cards to be made, I made this a separate little job and this was a great job to do while watching the Olympics on TV one night.
  3. Next I cut thin strips of paper and had the different coloured strips in their own bundle.
  4. Sewing time! I set myself up at my sewing machine with my pile of cards next to me, my bundles of paper strips and sewed the strips across the cards. I would sew several cards at one time without breaking my sewing. As I came to the end of one card, I would just feed the next card through the sewing machine. This makes the sewing task much quicker than stopping after sewing each individual strip to the card. You then just snip the thread in between the cards ready for the next strips to be sewn. My daughter, who is enjoying her sewing at the moment, shared the sewing task with me on these cards.
And here we have the invitations...


And while I was making the invitations, I made the thank you cards as well.


Better get back to party preparations!

Thanks for visiting our blog, and I hope you have a great crafty week.

Cheers

Fiona x

Wednesday, August 13, 2008

One Man's Trash....

They say that one man's trash is another man's treasure. Well, that's exactly what today's post is going to be about!

While I have always been 'Green' to an extent, I've come to see saving our environment as a priority in my life. I think having a child has made me so much more passionate about preserving our resources for the next generation. Well, my philosophy has started to extend into my paper crafting. Do you know that each of us produces 4.6 pounds of trash every single day? Now, I no longer look at my 'trash' in the same way. I hope that once you read this entry, you'll feel the same way.

One of the tenets of living a Green life is reusing things whenever possible. Making cards is a perfect way to use some of those things that you may normally throw away.
My first card began life as a pile of trash.


The first thing I did was cut a section of the corrugated cardboard. This became the front of my card. I peeled away some of the paper and dry brushed it with green paint.


Next, I made my own embellishments. I used some plastic packaging from stamps I recently received. I punched flowers from the plastic and dropped several drops of alcohol ink on them. I also added several drops of blending solution and swirled it around a bit.


Once the flowers were dry, I traced the edges with a Sharpie pen and added a button center. To complete the card, I used paper scraps, hemp and a rubon.


So, next time you go to throw something away, take a closer look. Could it make a fun embellishment? Might it be the basis for a great background? I'm sure you won't look at your trash the same way again once you get started!!

Have a great day,
Anabelle