Monday, September 29, 2008

Chipboard and Maya Mists

I've recently aquired some new Maya Mists, a new colouring medium by Maya Road. I particularly like using them to colour my chipboard pieces. The mists are very easy to use, the chipboard is dry within minutes and the coloured surface has a lovely matt finish.

Here's how to use the Mists
Lay out the chipboard you wish to use. Place a large piece of paper under your chipboard as the mist does cover a large area when sprayed.

A couple of sprays will be enough to cover the chipboard. Leave to dry.

In a couple of minutes your chipboard is dry for you to continue with your project.


Maya Mists can also be used to colour cardstock or paper, in this case the base of my card. A couple of sprays was sufficient to cover my card giving it a "spritzed" look.


I further enhanced the my chipboard pieces using my souffle pens to add a little glitter and glaze.


To finish off my card I glued the chipboard pieces to the card. The "icing" section was raised slightly with a foam adhesive. And I finished my cupcake with a little flower decoration on top.


This was a very simple and quick card to put together. The Maya Mists enabled me to colour my chipboard easily and I was able to assemble my card in less than 10 minutes.

Materials:

Thanks for visiting. Hope you have a great day.

Cheers

Fiona

Thursday, September 25, 2008

Wordles & World Card Making Day

I keep a handy-dandy notebook in my purse because I find myself being inspired or want to remember something when I'm away from home. I use it to jot down websites, ideas, etc. when I'm out and about. Last week, I was glancing through my notebook and decided to visit a website I had written in my notebook after seeing it referenced in one of my favorite magazines. The site is Wordle.net

Later in the week when checking my email, I received an email reminder that the 1st Saturday in October is World Card Making Day (WCMD). Basically, WCMD is a celebration for card makers around the globe to celebrate the craft. WCMD also kicks off holiday card making season. The holiday is hosted by Paper Crafts Magazine.

So I decided that I wanted to share both things with all of you in this one blog post. I'm sure we can all guess where I'm going with this...

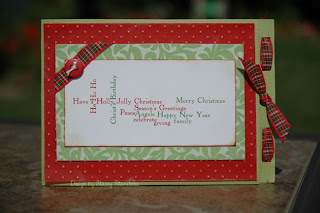
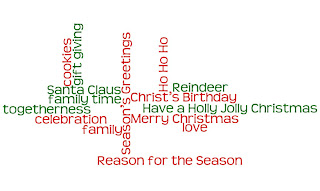
Here is the card I made using my Wordle. I've also included two of the many holiday Worldles that I created. This card opens like a matchbook on its side by the knotted ribbon. The ribbon along the edge was threaded using a dash shaped hand punch. (Click image to enlarge)

Design by Stacey Stamitoles
Supplies: Cardstock: Bazzill, Red Vellum:WorldWin, Swiss Dots Embossing Folder: Cuttlebug, Flocked green paper: Target, Software: Wordle.net, button, Misc. ribbon, red ink: Paper Salon


The Wordle program is pretty simple. Basically, you type in any words you'd like to use in your wordle. You can do any theme/words you'd like. You can determine what font, colors and whether you'd like horizontal, vertical, half n half, etc. check it out and have fun. I'd love to see what you all come up with! If you would like to use the above Wordles for your personal holiday cards, just right click the image and then choose "save as". You can then print them on your home printer.

Don't forget about next Saturday (October 4)! Visit the WCMD website and see what all they have planned! I would love to see any holiday cards you make using the Wordles or ones you create for WCMD! Just post your links in the comments section of this post. You never know....I might just have a freebie give-away! <wink>
Happy Card Making!
-Stace

Monday, September 22, 2008

Seeing things a little different

About a week and a half ago I was reading a scrapbook related website and read a blurb about a photography technique I had not heard about before. It's a rather bizzare sounding thing, but something about it peeked my interest, so I went off to read more about it. Ten days later I had in my hungry little hands the tools needed to venture off on this new quest of seeing things a little differently.

You may have already heard about "through the viewfinder" photograpy - TTV for short. It's basically taking a photo with your camera while looking through the viewfinder of another camera. It's a fun way to experiment with your digital camera. Most of the cameras used are vintage twin-lens reflex cameras. The popular ones are Argoflex Seventy-Five and Kodak Dualflex. Well, you can read about all the technical stuff on the net - just google ttv photography. Oh, and you have to build a contraption, too. Yeah - a contraption. Google that, too.

Within a few days, I bought a camera for less than $15 including shipping. My camera arrived Saturday - just two days ago. It's an Argoflex Seventy-Five. It was in excellent condition and even came with a leather carrying case, which I really don't need, but it's nice to have it. I disassembled it to check the inner parts, which were all in great condition, then I cleaned the lens(but not too much).


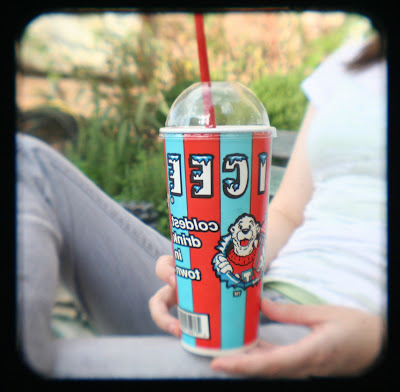
It was midday and the sun was hot, but I took an old cereal box and crudely made my first "contraption". Then I went outside to see what I could photograph. Here is one of my first photos.


After reading up a bit on filters, I purchased in inexpensive set of macro filters and built a more sophisticated contraption. Sorry, no photos of that. But I did go downtown and snapped away. You'll notice if you look around on the web at ttv galleries, that the amount of dirt on the lens varies from camera to camera. It's a desirable effect and unique in every camera. Here are some photos of day two.


You've probably noticed that the text is reversed. The camera takes a mirror image. I find another cool effect along with the slight curve of the photos themselves. Later that day I went to a tailgate party and brought along my newfound toy. It's a great conversation starter. You don't even have to do anything because people almost chased me through the parking lot wanting to see the "old timey" camera. What a hoot. Here are a couple of pics I took before the sun went down.


I hope I've inspired you to try something new this week. I've enjoyed playing around with my new toy and as soon as I figure out how to print out square photos, I'll be putting some of these on my scrapbook pages. Have a wonderfully inspiring day!
Photobucket

Thursday, September 18, 2008

The Art of Stamping Flowers

I recently found some really fun and interesting stamps at Kitchen Sink Stamps. Many of her stamps are referred to as "3-step" and in essence you are "painting" a flower or other design as you go. BUT - there is a challenge in figuring out what stamp pads and what colors to use to create the different layers. I wanted to not only show you the flower and leaves that I stamped but I wanted to show you the pads that I used. Mostly because you can see from the photo below that I mixed up the different companies of stamp pads in my choices.
These are the actual pads that I used for this flower. When you are stamping these layers or steps, you have to find colors that are going to get stronger or produce contrast to the layers. I found that hard to do with just keeping with one company or one kind of stamp pad. I have even mixed in the Fluid Chalk stamp pad and the ColorBox, Pigment ones. Here is a great example of not being afraid to experiment and play! You should see my pile of rejects!!! They all seem to work together and one thing that I really like is that as you creation sits for a minute, the colors seem to melt together. So if you aren't happy with your initial image, leave it for a little bit.
In the photo above, you can see the layers to this particular flower. For some reason I didn't stamp them in order so you have to follow the numbers that I put on each one. And, for my flower I used the Treasures cardstock by Worldwin and you see the texture in the paper that gave a "canvas" look to my flower.
Layer #1 - Vivid Yellow
Layer #2 - Marvy Brilliant Yellow
Layer #3 - Memento Tangelo
Layer #4 - Distress Ink - Vintage Photo
Each set of stamps from Kitchen Sinks stamps comes with a number of images in each set so you can see here one of the leaf choices. My background is an embossing plate by Provo Craft and that is highlighted slightly by rubbing over it with Fluid Chalk stamp pads.
After my flowers and leaves were stamped, I coated all of my cut out images with Inkssentials Crackle Accents. As this liquid dries, it cracks and I added a little emphasis to the cracks on the flower by patting it with a brown Fluid Chalk stamp pad. The brown ink "goes down into" the cracks to bring them out a little. I didn't add anything to the leaves.
Thanks for visiting Pursuit Of CraftYness today! The group of crafters here post yummy projects for your viewing pleasure and hopefully we have inspired you to try something new!!! Linda
CRACKLE DAISY card
Materials list:
Cardstock
Patterned paper – Wallflower/Times Nouveau Collection/Graphic 45
Cuttlebug embossing plate – Provo Craft
Fluid Chalk stamp pads – Clearsnap
3-Step Daisy stamp set – Kitchen Sink Stamps
Marvy stamp pad
Vivid stamp pad
Memento Stamp pads
Inkssentials Crackle Accents – Ranger
Ribbon

Sunday, September 14, 2008

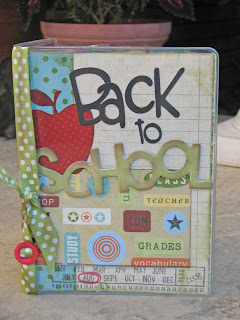
Back To School Keepsake Album

It seems that each year the summer gets shorter and the kids head back to schooler earlier and earlier. I think this summer was truly one of the fastest summer's I can remember. We were not excited this year when it was time to get ready for school.That signaled that summer was done, vacation was over and all the responsibilities and work that come along with school was staring us in the face. Our school year is quite hectic with three kids. Crazy amounts of papers, meetings and commitments that keep us so busy we often forget to stop, take time and remember the special little things about the kids that can get lost in the shuffle.

Last year I created a little back to school album that I loved so much, and the kids did too. I decided to make it again this year. It's a perfect way to keep record of the likes, height, weight, a current photo, and what I really love...their handwriting. I had each of the kids complete their own pages so not only do you have all their information but a record of their handwriting as well.


Supplies:

Paper Salon Clear Folio, Bo Bunny Pep Rally papers, Bo Bunny Home Run papers and Cut Outs, Bo Bunny Teen Chic papers and stickers, Bo Bunny Star Struck papers and stickers, Bo Bunny DisStress Me Out stamps, Bo Bunny Chipboard, Bo Bunny Double Dot Ribbon and Buttons, Cricut Makin the Grade cartridge, Colorbox Chalk Inks, Martha Stewart Writing Pen

There are so many more ideas for what the album could contain. Here's some to get you started:

1)Take photos through the year of all the artwork you child brings home. Then make a those in a little book to showcase the artwork and projects they made throughout the school year.

2)Perhaps you have a child moving up to middle school or even high school. Add in more pages, have them take pictures of their close friends and even complete information about their friends.

3)Or maybe you have a child who loves to play sports! Turn it into an album to share their uniform pictures, team standings and record, Coach information and more!

I find these smaller albums are by far some of my favorite things I have made! Hope you give one a try too!

Julia

Thursday, September 11, 2008

A bit of this and That


Hi everyone Kelly Here... Hope everyone is back into the swing of school again...


I am a huge fan of Tim Holtz Distress ink. This card is an example of fading the inks together
for a fun twist on the stamp.  I was not looking for the perfect image. I wanted a 'softer' loo so I rocked the stamp a bit to soften the lines. 

After the Card was stamped I softened the edges with ink. NAd added dimension toe the tree with bling and metal Brass it ups by Kandi Korp! Fun stuff I tell ya!


Stamp- Unity Stamps Company
Ink Tim Holtz distress ink
Paper Little Yellow Bicycle
Ribbon-Self Adhesive SEI
Bling and metals- Kandi Korp

Ha ve a great weekend and enjoy experimenting with new ideas and techniques!

Monday, September 8, 2008

It's beginning to look a lot like Christmas...

...everywhere you go...

Ok, not so much. Here in Texas, we haven't even moved into that week long season we like to call autumn yet. It's still hot, hot, hot. Just the way I like it, by the way. And what better thing to do when it's a chilling 95° outside than make Christmas gifts? Crazy, I know, but follow me here.

Like many of you, the number of people I would love to give Christmas gifts to each year far outweighs my wallet's ability to do so. The love is much bigger than the green, you see. But a few years ago, a little solution fell right into our laps and it's been a tradition ever since. One happy summer day we went over to my parents' house. At the time they lived on a large lot complete with a back fence that was filled to the brim with wild blackberry bushes. And on this fateful day, Mom and Dad had just finished canning homemade wild blackberry jam. And so the story of how we became jam makers begins.

Seriously, the jam that they made that year was pretty much the best tasting jam *ever*. EVer. I swear. So what did we do? Came back the next day, picked bucketfuls of berries (did I mention that this was July and well over 100° outside?), and marched on home with the jam recipe in hand. The next day we took those fresh berries and made forty-five jars of jam. (Yes, it was a lot of berries.) At the end of that weekend, 45 affordable Christmas gifts were finished and happily put away to await their new homes in a few months. (One jar immediately went to live in my fridge, so it was actually 44 gifts.)

So, now we make jam every year. This was our fourth year, and therefore the fourth recipe we've tried. (Trust me, I would have loved to have made the blackberry jam every single year of my long life, but Mom and Dad moved to another house that year. And, yes, I did contemplate going over to the old house in the dead of night and stealing those bucketfuls of blackberries.) This year's variety is Triple Berry Jam. We always use a low sugar recipe, and I believe that is absolutely necessary to making a great jam. It allows the flavor of the berry to stay true and uncovered by too much sweetness.

You may be asking yourself, "Self, this is a blog about being crafty. How exactly is making jam crafty?" And I would answer you that... uh, I'm not sure. I do know that it's homemade, and I love that in a Christmas gift. I do make stamped labels to go on the top and I package the jars in little bags along with the stamped Christmas card and stamped tag. You'll see that in a sec.

1. First off, choose a recipe. I've included the one I use below. It came straight from the box of Sure Jell Pectin (I use the kind that is for less or no sugar needed). It gives instructions for lots of different fruit jams and jellies. A basic recipe makes about 8 cups (8 half pint jars). Don't double the recipe and try to make 16 jars at once... I'm not sure why, but don't do it. Just make one batch at a time. (If you'd like to view the actual recipe straight from Sure Jell, just click here.)

Triple Berry Jam
3 pints strawberries
1 1/2 pints raspberries
1 pint blackberries

2. Second, assemble the ingredients. We make a little pilgrimage to the Dallas Farmers Market each year to get our fruit. (That is one of the best parts of this gig because you just walk around eating the entire time. Would you like to try some watermelon? Why yes, I would. Tomato? Yup. Corn? Bring it on. This year's sampling even included some Herbal Lemongrass Sorbet... yeah, that was good stuff.)

You'll also need pectin, sugar, jars, and lids. All that can be found at your local grocery store, Wal-Mart, etc. It's usually about $7 for a dozen jars and lids. You'll need one box of pectin for each batch.

Go ahead and wash the jars and lids, then let the lids sit in a saucepan of hot water while you work. (I think this softens the rubber part on the inside of the lid.)
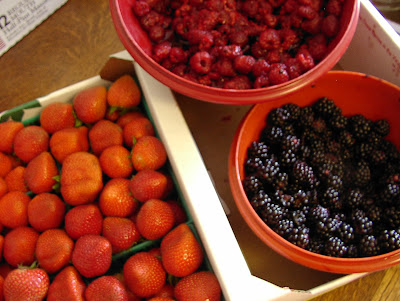


3. Wash the fruit and prepare them as necessary. (Hull the strawberries, etc. I rough chopped the strawberries.) Then, 1 cup at a time, crush the fruit using a potato masher. Jam should have lots of chunky fruit, so don't demolish it. A couple good mashes will do it.
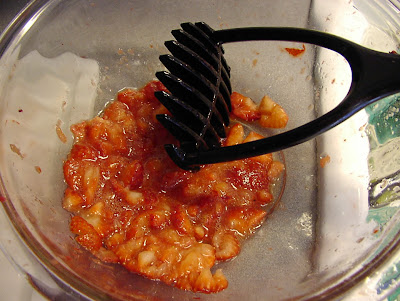
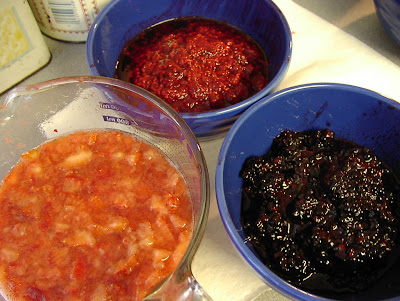


4. Measure the exact amount of prepared fruit into a saucepot. The triple berry recipe requires:
3 cups crushed strawberries
1 1/2 cups crushed raspberries
1 1/2 cups crushed blackberries
4 1/2 cups sugar

5. Mix 1/4 cup of the sugar (from the 4 1/2 cups) with the pectin in a small bowl. Add that to the fruit along with 1/2 teaspoon of butter or margarine (this is to help reduce foaming and it does help.)

6. Bring the mixture to a full rolling boil (a boil that doesn't stop bubbling when stirred) on high heat, stirring constantly.


7. Stir in remaining sugar quickly. Return to a full rolling boil and boil exactly 1 minute, stirring constantly. Remove from heat.

8. Ladle quickly into prepared jars, filling to within 1/8 inch of tops. I keep the clean jars lined up by the stove. We use a canning funnel that I found at the grocery store and it is super helpful. This part is much easier with 2 people - 1 person can ladle and 1 person can move the funnel into each jar, etc.

9. Wipe the jar rims and threads then cover with the lids and screw the bands on tightly. Place the jars in a giant pot. (I don't have a canning pot and won't be getting one... my spaghetti pot works just fine!) Add water to the pot and cover the jars by 1 to 2 inches. Bring the water to a gentle boil. Process for 10 minutes.

10. Remove the jars (we use long tongs to to that) and allow to cool completely. After a while, you should hear the little jars start "pinging" as the lids pop down and seal. Let stand at room temperature for 24 hours.

Just some of this year's jars:

11. Clean your kitchen. Or come clean mine.

Important to note... keep the boxes the jars come in!!! Stick the jam back in the boxes and they'll be nice and protected until Christmas.

Here's how I normally package mine:

I like to print the labels on the computer so that I can do a bunch of labels on one sheet of cardstock, then use a punch or circle cutting system to make the circles. I overstamp the lables with a design that complements that year's Christmas card. Then I run the labels through my mini Xyron (the tiny X" shaped one) to get the back nice and sticky. I like to use the mini size handled kraft bags that are available at Michael's, etc. to stick the jars in because I can also stick the card in there, too! Then I add a coordinating tag and the name so that I can quickly identify each bag as I hand them out (I do write in each Christmas card, so each bag has to have the right name on it). For the card that goes with the pic above, I used some Wordsworth clear stamps on shimmery white cardstock and did some simple watercoloring. I scribbled with a glue pen and added glitter to make the snowy ground.

This past year I was sending out both Christmas cards and a birth announcement in one envelope, so I kept the Christmas card super duper simple. I just printed the sentiment on patterned paper and used an SU punch to cut them out. I printed the greeting on PP as well and cut those into strips. The card is not actually a card - just a panel - so I stuck the picture on with clear photo corners, then stitched the sentiment and greeting on. This left the backside open so I could write there.


Here's what I love about this crafty project:
1. All in all, the jam usually comes out at a total cost of around $1.25 a jar, depending on what kind I make.
2. The entire project, from start to finish, is done in one day. (I do save the label making for a little later so that I can coordinate the design with the cards.)
3. Not only is it done in one day, it's done several months in advance, ahead of the busyness of the holidays. It's such a good feeling knowing that I've got a jump on things!
4. It's homemade.
5. Have a mentioned that it is good? Go-od. Trust me.

So, I encourage you to craft a little homemade Christmas project now! What are you waiting for? It's already September, people!

Later!
Jessica

Thursday, September 4, 2008

Happy New Year!

I don't know about you, but for me, the start of school is much more MY new year than the actual January 1 date. It's never been more true than this year, either, as my family and I have just completed a move to Northern Virginia. My sons are at seperate schools this year, too, so between all of that, I'm swimming in paperwork.

Since we are in a new home, I've been able to adhere to my favorite adage a bit better (I'm a poster child for "A place for everything and everything in its place"!), although the last couple of days have been challenging. This morning, knowing that I needed a project to share with you, I decided to create something that would pull double duty. Here's what I came up with (and it only took about an hour to create!).


Similar to an accordian file, this easy creation is going to keep all those pieces of paper organized perfectly! I started by determining how many files I wanted (I went with five - too many tends to give me too many places to lose things), then cutting and covering chipboards covers. Once those steps were done, I punched all the pieces for binding.


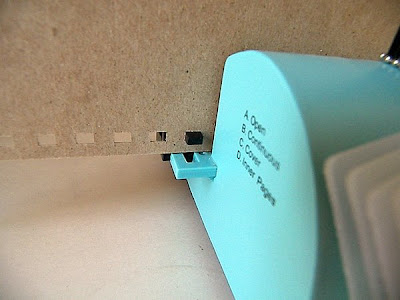
I use my Bind It All from Zutter quite often, so for those on the fence about getting one, I give it two thumbs up. This black tab on the side is an often-overlooked feature on this machine - it allows you to line up your holes perfectly every time, especially important when you're punching lots of pieces, such as here.

Once all the pieces are punched, you can thread in the wire coil and bind. Here's what the inside ended up looking like:


I didn't want to create an all day project, so in the interest of keeping it simple, I decided that I wanted some sort of label on the front. I turned to my Spellbinders dies and choose Antique Label 1 because it reflected the feel of the papers that I had chosen. Once I cut and embossed it, I used it as a stencil with matching ink.


I then stamped "New Beginnings" (so appropriate!), a Papertrey Ink sentiment. Look at how cool it turned out!


I hope that this inspires you to create a beautiful home for all of your paperwork. If you have any questions about the tools that I used, or the specifics of how to create something like this, just LMK! Happy New Year! ;)