Thursday, October 30, 2008

Stamped Thanksgiving Cards

Yeah - you read that right... Thanksgiving. You have exactly 28 day, 7 hours, 43 minutes and 2 seconds until the big day.... depending on when you are reading this.

I wanted to get an early start and wanted to share a few of my stamped cards. Three of these cards use a set of acrylic stamps from Art Warehouse called "Autumn Days". It has several titles and greetings, a variety of images and two long definition strips. Great for both cards and scrapbooking.


For this card I used Basic Grey papers. I machine stitched around the edges of the cardstock that the image is stamped on. I used Clearsnap "Vivid" ink (coffee bean).


For this card I used Basic Grey and Autumn Leaves papers. The turkey is stamped, and the greeting is made from rub ons.


This card (still using the Autumn Days stamp set) uses 7Gypsies and Fancy Pants papers. These papers and the embellishments came in the November Cupcardstogo Card Kit.


This last card uses a stamped tag. The tag, papers and embellishments are also from the Cupcardstogo November kit. The tag was pre-stamped. I added orange Stickles (from Ranger) to each of the leaves. Really, it wasn't that hard, and it sure makes the leaves sparkle. You can see the step-by-step instructions for this card HERE.


I hope I've given you a few ideas and inspiration for the upcoming Thanksgiving holiday. Thanks for stopping by and happy creating!!

Photobucket

Monday, October 27, 2008

Think Pink!

In honor of October being Breast Cancer Awareness month, I thought it would be fun to create a pink, girly kind of card that would be great for sharing with a friend.
I tried to pull out all of the "girly" kinds of embellishments I could think of to make this a joy to give and to receive.
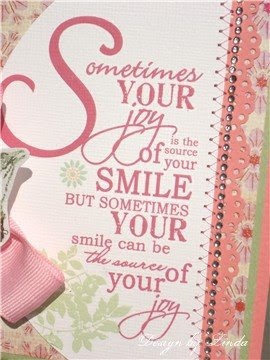
This wonderful phrase is a rub-on by My Mind's eye. I cut the paper that holds it with a circle shape so I could add this to the front of my card. The scallop border is a Martha Stewart border punch and I added a line of machine sewing and some tiny rhinestones.
The bird on the branch is also a rub-on. I rubbed it onto white cardstock so that I could then cut that shape out to use as an accent. The swirls are accented with glitter. I used Glitter Fabric Dimensional paint from Tulip. I like this glitter because it gives a subtle amount of bling while still letting you see what is underneath. A big bow was added to the card with a brad and the bird accent was glued over that.
Thanks for visiting the Pursuit of CraftYness blog today, Linda (lbpost)

YOUR JOY card
Materials list:
Solid Cardstock - Prism
Patterned papers – My Mind’s Eye and Bo Bunny Press
Rub-on phrase and bird – My Mind’s Eye
Circle template – Coluzzle
Glitter Fabric Dimensional Paint – Tulip
Ribbon
Machine Sewing
Border punch – Martha Stewart

Thursday, October 23, 2008

My Spooky Stuff!

True confession...I think I might like Halloween more than Christmas. Not sure..still thinking. But you have to admit..it's lots of fun, you get to decorate your house, the colors and items you use to decorate..spiders, pumpkins, ghost etc etc are all VERY fun, it involves candy...hmmm...need I even say more? Oh and you don't need to dust your house..after all..what spooky house has clean, dust free decorations?! So..needless to say Halloween is definitely become a favorite.

Each year though I struggle to find a cute, fun way to showcase my photos. After all..they pretty much are the same..although the kids are wearing different outfits. But they are still doing much the same. As I walked through the house, my daughter commented I should take some pictures of all the fun decorations we have out for something different to scrap. Which is great..but then what? A layout of course to showcase some of my oh so Spooky Stuff!


Supplies:


Orange Cardstock
Teresa Collins Spider Web, Halloween Journal Tags, Halloween Circle Tags paper
Bo Bunny Hallows Eve Rubons
American Crafts Daquerie Alphabet Stickers

Making Memories Spellbound Clear Embellishments, Spellbound Brads & Spellbound Alphabet Stickers
Stickles - Lime Green

Bazzill Paper Brads - Festive
Colorbox Chalk Inks - Charcoal, Tangerine, Creamy Brown

Michael's Ribbon

*Using the Spider Web paper…cut off the kraft edge border around the paper. Then adhere the paper onto a piece of orange cardstock. Ink the edges of the orange cardstock with black ink to dirty it up a bit.

*For my photos I worked with a digital photo template I purchased online from Designer Digitals. I’ve long admired the multi-photo layouts and how fantastic they look. So I decided to give it a go and was incredibly pleased with the results. Once I added my photos, I printed the sheet out and trimmed off the excess photo paper.

*I then cut a piece from the Halloween Journal Tags paper that measures 7 by 9 ½. I used my sewing machine to stitch a crazy zig zag stitch onto the paper edge. If you don’t have a machine…consider using some rubons. After stitching I inked the edges with black ink.

*Next cut a strip from the Halloween Journal Tags paper that measures 3 by 12. Ink the edges with both brown and black inks. Adhere onto the spider web paper above the Happy Halloween design. Again…if you have a machine, add the zig zag stitch to the ends.

*Now adhere the black wavy print paper along with the photo collage.

*Cut the black crow from the Halloween Circle Tags paper. Inks edges with orange and add a dot of lime green Stickles for the eye. Add to top right side of paper.

*Next ink the Bazzill paper brads with black ink. Add Bo Bunny spider rubon to the brad. Attach brad with Making Memories clear spider tag.

*Cut phrases from the Spooky Words paper. Inks edges and staple to side of paper. Add Making Memories clear frame over “creepy” cut out word.

Tie striped ribbon across paper.

Add Thickers letters. Finish off with Making Memories Spellbound alphabet stickers. Add Making Memories clear bat and bat brad. Finish with Bo Bunny spider rubon on top right spider web.

And one more item..a very quick Halloween craft! I had picked up a lampshade kit at Target in the dollar bin. Not knowing at the time what I'd use it for...just that I would use it. I realized it would be perfect for a fun, spooky Halloween nightlight for our guest bath.


I took off the fabric cover it came with. The holding it up to a light...chose how I wanted the Bo Bunny Spooktastic print paper to go across. I wanted to be sure I had the bats positioned across it. I used the fabric cover as a template for the paper. Cut that out, inked the edges and then added a few more Bo Bunny Hallows Eve bat rubons to the paper. Next I adhered it to the nightlight. Then finished it off with a little rick rack and pom pon ribbon! It's one of my favorite decorations this year!

Happy Haunting,

Julia

Thursday, October 16, 2008

Feels like Fall...

finally! Today is actually the first day we've seen less than 85°. And ya know what? I'm fine with the fact that it's taken so long to get here! I don't live in Texas because I like snow, ya know what I mean? However, I may not like the cold, but I do love fall decorating! Last year's fall included the addition of this little (now big) cutie... {insert gratuitous picture of cutest baby ever here}


...so needless to say, fall decorating did *not* happen last year. Dinner barely happened last fall, much less decorating, so I am making up for it this year!

I'm sure you've seen the fabulous Martha Stewart glittered pumpkins. If not... well, I don't know how you missed them cause I thought I was pretty much the last person to hop onto the little trend bandwagon that is (are?) glittered pumpkins. Anyhow, the basic gist is a) grab a pumpkin, b) drown it lovingly in glue, and c) coat it (and probably yourself, your workspace, your everything) in glitter. In case you're the visual type (and really, you're reading a blog, so I'm gonna guess that you are...) here's what you'll need...


1. Spreadable glue. My glue of choice: Mod Podge Matte. Just cause that's what I have and use on everything else.

2. Foam brush to spread glue. Mine has obviously seen better days.

3. Glitter. Possibly the best glitter ever: Martha Stewart Craft glitter available at Michael's & Wal-Mart. Their slogan should be "One bottle will last a lifetime!" because seriously, it will. You will be able to make pumpkins until the end of time with one bottle. Should cost you between $3-5 depending on sales, etc. I used Fire Opal, Brownstone, and Smokey Quartz.

4. Coffee filter and scrap paper (I used chipboard).

First step... glue up the pumpkin. Now, do not spread glue over the entire pumpkin and then think that it will still be wet enough for the glitter to stick everywhere. (Yeah, I have no idea why I thought that would work.) This is a tiny pumpkin, so I spread glue over a few sections and then moved to the next step...


...which is glittering! Just open the bottle and start dumping. I don't bother with the little sprinkler do-dad that's in the lid... just easier to dump.

Do yourself a favor and work over some kind of scrap paper... newspaper would be great. Spread it everywhere. Even places that you think glitter could not *possibly* end up. Because it will. Seriously, though, if you're doing a larger pumpkin, I would do newspaper over a big ol' portion of the tabletop. Then set a piece of chipboard on top of that. For this little pumpkin runt I was able to just hold it pretty much the whole time over a coffee filter. You won't be able to hold larger pumpkins the whole time, which presents a problem because eventually you will have glue and glitter over the bottom portion of the pumpkin, too. I recommend the chipboard because the glue won't tear off pieces of it like it might with newspaper.

After you've glittered a section of the pumpkin, it may help to use a soft brush and brush off the extra glitter that's not stuck to the glitter but is still stuck to the pumpkin via static, etc. This helped avoid any extra glitter getting into my bottle of Mod Podge. I could have solved that altogether by just putting some Mod Podge in a little bowl, but apparently that was too much work.


Here are some of my pumpkins on my mantle! It's been gray here all week, so excuse the lighting. You can use the fake pumpkins from the craft store if you prefer. I was concerned with how they would store due to the glitter, so I went for real, although I'll probably switch it up and try fake next time. This post goes out to my friend, Carri, who was at my house last week and exclaimed "Hey, those are *real* pumpkins!" after looking at them for a few minutes.

And, if you prefer your pumpkins un-glittered, here's one more pic from the house. You can find this little Trick or Treat frame in October's Paper Crafts magazine. Super simple masking technique.


All righty, folks! Hope you enjoyed today's little glitter fest. The best thing about this project is that it can be done with tons of things. What about glittering huge leaves from your yard or the park in fall colors? Or acorns? Or what about those paper mache boxes from the craft store that are shaped like leaves or acorns? You could even glitter a frame with a pic of the kids at the pumpkin patch in it. Or put one of those glittered leaves in a frame... might have to try that one. There will be more glitter projects in store for you this Christmas... I'm already working on some other ideas!

Later!

Jessica

Monday, October 13, 2008

Trick or Treat!

Can you believe Stacey's last post?! WOW - there are just the best festive ideas!


I'm in a phase right now where I'm really trying to use older supplies, and my little trick or treat project today is no exception. The halloween papers in Paper Salon's Spice collection are so fun that it's tough not to use them!


I'm busy planning what little goodies to send my niece since I won't get to see her trick or treat this year. I decided this card would be right up her alley. I cut the squares with Spellbinders Nestabilities. The stamp is from the most adorable Hero Arts set. I simply colored the image with some Prismacolor pencils, added a little paint and rhinestones to make a great focal piece. For the rest of the card, I did some quick, decorative stitching and applied some Black Stickles on the edges. Since my niece is 5, she will definitely appreciate a little added bling!


This was fun & easy to make - it's a tube of M&M Minis covered with paper! I think I may end up making more of these for my son's class. Once again, I used my Nestabilities for the top circles, and that same Hero Arts set. A little colored pencil, ribbon and voila! A cute little treat that's sure to please!

Thanks for sharing part of your day with us! Happy creating! ~ Jennifer

Wednesday, October 8, 2008

Halloween wreath, cheesecloth ghosts & more

I absolutely love Halloween! For me, it is all about kids dressing up and becoming something or someone else for a short time, trick-or-treat, kids laughing and running from door to door, oodles of candy...but most of all I *love* to decorate the house! So my blog post is all about Halloween and the fun you can have around the house. I also have included two tutorials; Making a wreath and ghosts to decorate with indoors.

This is the bookshelf in our family room. It sits just below our fireplace mantel. I collect these gorgeous candle stands all year long and noticed they have a cool kind of "Gothic" look when grouped with Halloween decor. Note the toy eyeball in the pumpkin and the black, fuzzy, FAKE mouse on top of Mr. Pumpkin Head. I found those realistic mice at Walmart for $1.00 each! I bet you can guess what's lurking in the shadows of my home.

Here is a tutorial for a wreath I made last weekend. It cost under $10.00 to make.

Supplies you will need:
Grapevine wreath, black spray paint, feathers, glue gun, glue sticks and some type of embellishment. (I chose those plastic toy eyeballs...only because I have all boys! LOL)

-First, protect your surface under the grapevine wreath and spray paint it using black paint. I painted mine out in our garage and let it dry over night.
-Next, I started adding one feather at a time and continued to fill in the wreath until it was full of black feathers.

-I added an occasional orange feather and finished off the wreath by adding the plastic eyeballs.
-Aside from the spray paint dry time, the wreath took me about 1 hour to complete.
-I have to get a waterproof spray because our wreath is on the outside door of our home.

Next up is a tutorial for creating cheesecloth ghosts. I remember my mom always had these around our house when I was growing up. For whatever reason, it was one of those childhood memories that came back to me this year. So I set out to find cheesecloth and liquid starch!
!
Supplies you will need: Liquid starch, cheesecloth (I found mine in the fabric dept of Walmart), paper towel tube, sticks/dowels/pencils, foil to create the head and googly eyes from the craft dept. You can also use empty water bottles, toilet paper tubes, etc. for the tall part of the body.

-First, build your body form for the ghost. It can be as rough form as mine, below. After you're done, the "guts" will be removed and you will be left with a cast of the shape. So fear not, no one will see the tube, pencils and foil.
-I taped my ghost form down by cutting small slits in the paper towel tube, folding them backwards and taping those tabs to an old box. Again, I did this out in my garage because liquid starch is a bit messy.
-Pour liquid starch into an old container

-Cut strips of cheesecloth to fit over the top of your form and that will lay over top of your ghost head and dangle onto the floor. This is important because having the base of the ghost touching the surface while drying is how the ghost will stand on its own, later.
-Dip the cheesecloth into the starch and wring out the excess.

-Repeat this step several times until you can no longer see through the body. I believe mine took about 5-6 layers.

-Allow the ghost to dry for at least a full 24 hours. Mine took a little more because it was a little cooler outside in the garage.
-After the ghost is dry, remove the form from the inside of the ghost. He will stand all on his own now!
Here is another look at the finished ghost. I added little googly eyes to his face but you could leave it blank if you'd like. They look just as cute. :)


Confession: I broke down and made some homemade Carmel apples last weekend, too! These things are my weakness and so easy to do.


Lastly, a card I made using a stamp from Stampendous. I didn't have a funny stamp with saying/greeting that went with the image stamp so I printed my own from the computer.

Supplies: Stamp: Stampendous; Ink: Versafine; Cardstock: Bazzill Bling, DCWV; patterned paper: BoBunny; Punch:Fiskars border punch; Pens & pencils: PrismaColor pencils, Sakura gel and glaze pens

I hope something here will inspire you to take part in the fun, whimsical, light-hearted Halloween decorating & crafting. (I tend to avoid the scary side of Halloween) LOL :-) Happy crafting! -Stacey

Monday, October 6, 2008

It's that time of year...

Here in Michigan the leaves are changing, Jack Frost keeps visting, and it's time to get out the Halloween decorations. ;)

I thought I'd share a few things I've done this weekend to get in the spirit. First is a card and treat container set. I used Doodlebug glitterd cardstock, Teresa Collins papers, and the cutest little Martha Stewart owl.


Next I made a quick little wall hanging using the same Doodlebug glittered cardstock, Teresa Collins papers, trims, wire, and ribbon.


And lastly, a wreath I made last year by spraying a regular grapevine wreath with black spray paint, adding stretchable web, spiders, and a wooden plaque.


Happy creating and thanks for stopping by!

-Sherry

Thursday, October 2, 2008

no tricks...just treats!

October is offically here, which means Halloween is just around the corner! Halloween treats are always fun to pass out to your kids, teachers, co-workers and friends & family.

I thought I would share some ideas on decorating yummy treats with your own creation of spooky papers. I found some great Halloween stamps at Michaels for only $1 each, but you could use whatever you have on-hand or even use some Halloween clip-art.

Instead of buying new papers, I used some older papers I had in my stash and made them into spooky, new ones! It was really easy to do and I bet you even have the supplies on-hand already. Here are the Halloween colored papers from my supplies that I used. These are from Karen Foster, but any colors that you like to use for this holiday would work.


You can do the following to either a whole sheet, smaller pieces (great way to use up scraps) or pieces you die-cut first. I tried all three ways and I found working with smaller pieces a bit easier. For this example, I pre-cut what I wanted to use for my treats.

Once you have chosen your papers, ink them up with black, brown or a combo of the two. I used a bit of both for mine this time. I used my Ranger blending tool to apply the ink, but you could use a make-up sponge or whatever you like. It doesn't really matter what ink you use, but I used a mix of Ranger Distress & Versafine. Apply as much or as little as you want until you like how it looks.

Next I misted the inked papers with water. You could probably skip this step if you want, but I think it helps to kind of "blend" the inks together with the paper and softens the ink too. Again, its personal preference...do it how YOU like it! You can also add more ink while your papers are wet.

You can let them dry now or you can move to the next step. I'm not very patient, so I didn't wait for them to dry before moving on. I think this is the fun part...now add some watercolor splats! All you do is use a lot of water and load up your brush with black watercolor paint.

Then shake & tap your very wet brush over your papers. This can be messy (or maybe it's just me?) but I used a tall box to put my papers in and then did this. You could also take it outside on the grass too. Here's what you'll have when your done.

Now let them dry.

Here is a photo of what the papers looked like before and after. See how spooky & fun they are!

Now for the decorating part. While going through my older papers, I also found these by Daisy D's and thought they would add an old, distressed touch.

Here are the treat bags I came up with, using the $1 stamps, my "new" old spooky papers and the distressed papers. To get a softer, stamped image, simply "kiss off" your stamp onto scrap paper first and then stamp your image. I think the softer images add to the oldness and look great with the spooky papers we just made. Look at the skeleton...you can see the crackled paper through...creepy!

Instead of tying my tag to the bag, I used a binder clip. I just tied my tag to the clip first and then clipped it to the bag. Simple & easy!

On the second one, I first stapled the rectangle over the top of the bag and then added my ghost tag on top. You guessed it...simple & easy!


Here are a few more that I did with some bulk candy, $1 treat bags I found at Target and more of the $1 stamps from Michaels.

I also did some candy bar wraps. The Spellbinders Nestabilities, large rectangle is the perfect size to wrap around a regular sized candy bar. No measuring or fancy folds...just a simple & easy die-cut! Then I just layered more of the $1 stamped images on top.

supplies used:
Pattern Papers: Karen Foster Lemon Chiffon, Kiwi Splash, Tangerine Swirl & Purple Swirl; Daisy D's Antique Dot, Antique Stripe & Antique Harlequin; Cut-it-Up Brushed Black

Stamps: Studio G Halloween (Michaels $1)
Ink: Ranger Distress; Versafine
Stickers: Making Memories Halloween Word Fetti
Die-Cut: Spellbinders Scallop Circle, scallop rectangle Nestabilities
Other: Provocraft Cuttlebug Machine

Ribbon: assorted scraps

Halloween bags: Michaels, Target

I hope I've given you some fun ideas to dress up your Halloween treats along with making those old papers into something new! If you create some of your own, make sure you link to it here so that we can check out what you did. I would love to see how you made some of your old papers into something spooky & new!