Showing posts with label altered. Show all posts

Monday, April 26, 2010

Altered art frame

I have this nice home decor item to share with you today.
Don't forget you can click the picture to enlarge to see it better, but hopefully my close ups will provide that as well. 

You are going to need the following-
8x10 inch frame
an embossed double mat, for an 8x 10 frame with a 5x7 inch inside opening

gcd studios products
Homespun Chic collection papers (Laquer, Petit Blossoms, Pink Redwork, Homespun Mod, Pink Stitchery, and Homespun Garden)
Homespun Chic embellishments-Vintage Buttons, Gem Brads, Fabric Brads
Artsy Urban embellishments- Glitter Transparent Shapes & Tags

glue
scallop scissors
three small clear or pink gems
computer font- century gothic
twine
Now to make this rose heart frame, there are  different parts.

Part One- paint an 8x10 frame black, then cover with a crackle medium ( you can find this at most craft stores) and then allow the crackle medium to dry, about 2 hours. Then using plenty of paint, paint the frame again with white paint. The thicker the coat of paint, the thicker your cracks will be in your top coat. 
At this point, you can finish the frame with a top coat of clear varnish, to protect it. or leave it flat for that more authentic distressed look.


Part Two-

When picking my papers to make this project, I used both the 12x12 papers and the 8x8 paper pad from the same collection. I also made sure to use papers with a background of white, helping keep everything feeling light and clean.
Making the flowered heart- the first thing I did was to cut my heart out to fit inside the frame. I used a piece of Pink Redwork, and hand cut my heart. It is about 3.75x4 inches big. To make the roses, first cut a 3x3 inch piece of paper into a rough circle. Then either freehand or draw on a spiral, spinning down to the middle of the circle. Cut along the line. Now take the center point of the circle, and begin rolling it up along the spiral. Basically each rose is a large rolled piece of paper. When you are at the end of the spiral, glue the end piece of the paper on flat to the roll. To make a bigger flower, simply allow the paper to relax before you glue the end in place, and it will enlarge itself. I also punched a small circle about 1/2 sized, and glued my rose bottom to that, it helps to give the rose more stability.
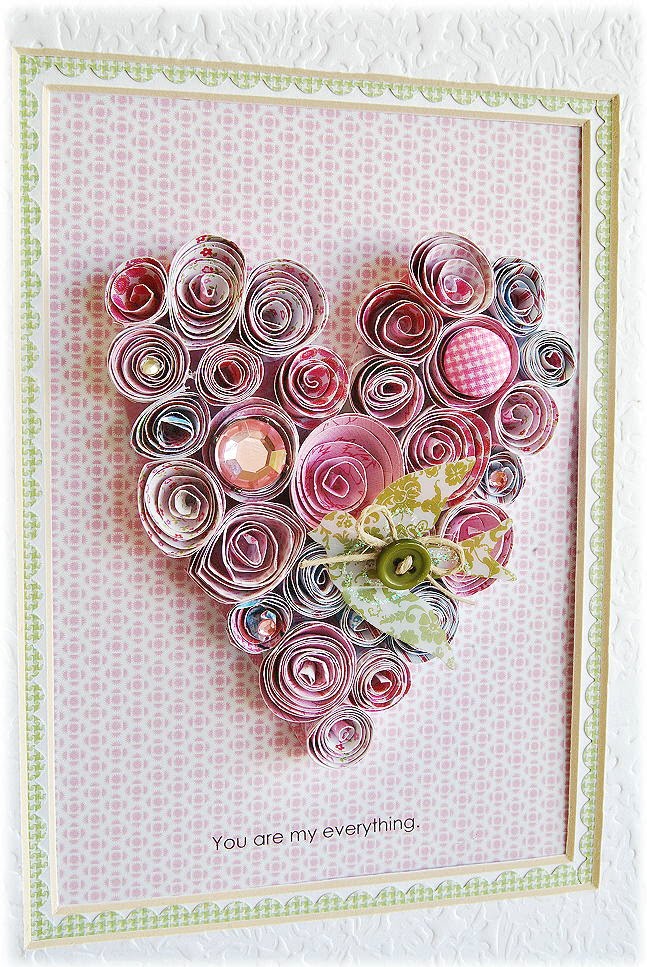


Continue making roses, smaller and larger to fill in on your handcut heart. 

Part three- 

Putting it all together. Using your computer, print out your wording on a sheet of patterned paper. Mine says "You are my everything."  I also took and cut thin scallops from the Homespun Mod paper with my scallop scissors, then added the green scallops in between my two cut photo mats. 
These photo mats were precut and embossed mats that I had purchased. 

I then adhered my heart of roses to my background sheet.
To finish the heart, I added two brads, one with a large pink gem and one pink gingham fabric covered. I also added three small gems to several of the rose centers. I also added this glittered transparent bird, adding a vintage button and a bit of a twine bow to the center.


To finish your frame, insert your papers and photo mats into frame . Hang on wall, or use stand in back to stand in place.

Thanks for dropping by today, I really hope you have enjoyed my altered art project.
kris

Wednesday, June 25, 2008

goodbye/farewell book

My daughter's friend is leaving her school this week. Phoebe and her friends wanted me to help them make a farewell/goodbye card for her that friends and teachers could sign. We talked about the project while pulling out the craft supplies, trying to work out what to make.

We came up with the idea of a farewell/goodbye book. A little like an autograph book, where each friend could write a little goodbye message on each page.

I covered the book, while the girls punched shapes madly from pattern paper (which by now covered the family room floor). These punched shapes were used later in the project.

Here's the cover of the book:


I've used a small Maya Road chipboard binder book as the base for this project.

The book was covered with pattern paper. When covering chipboard books I use Helmar 450 Clear Adhesive as the adhesive. This glue is fantastic for paper crafting as it doesn't buckle the paper or the chipboard as some wet adhesives do, and it is quick drying (I mean really quick).

I then used double sided tape around the book to hold a length of grosgrain ribbon in place, which will be used as the closure for the book.


The above detail was added to the cover and placed over the ribbon. A scalloped oval punch shape was added as a base for the letter stickers.

With the book finished, all that was left was the collection of "farewells" for the recipient. This part I left for the girls to arrange and to decorate their pages. The punched shapes they'd made have been used to decorate each page.


Materials:
Maya Road 4"x4" chipboard binder book
Me & My Big Ideas Chester Juniper double-sided paper
Me & My Big Ideas Glitter Alphabet Stickers (gold)
Helmar 450 Clear Adhesive
Ribbon

So next time you are creating a card for an occasion which will require several peoples' signatures, why not consider creating a little keepsake book instead.

Hope you have a great week, and thanks for visiting.

Cheers

Fiona
x

Wednesday, June 11, 2008

Making Memories -Sponsor Week continued

We hope you enjoyed the first round of Making Memories projects posted on Monday. If your like us and can't get enough of the Noteworthy line...here's more for today. Enjoy the inspiration!

"Summer Smile" layout
Designer: Julia Sandvoss

supplies used:
Making Memories Delany Ledger Circle Paper
Making Memories Addie Diecut Circle Paper
Making Memories Delany Floral Paper
Making Memories Glitter & Clear Diecuts
Making Memories Addie Ribbon
Making Memories Noteworthy Blossoms
Making Memories Glitter Brad
Making Memories Boho Chic Tiny Alphas
Making Memories Noteworthy Hilary Flocked Alphabet
Colorbox Chalk Inks

Heidi Swapp Jewels

"Grateful" layout
Designer: Anabelle O'Malley


supplies used:

Making Memories Noteworthy Delaney Die Cut Circle paper
Making Memories Noteworthy Addie Striped paper

Making Memories Noteworthy Glitter Die Cut Embellishments
Making Memories Noteworthy Clear Glitter Embellishments

Making Memories Noteworthy Delaney Shimmer Alphabet Stickers

Making Memories Tiny Alphabets

Making Memories Noteworthy Trim

Making Memories Noteowrthy Delaney Flowers

Petalloo Flower

Ranger Stickles

Crate Paper
Brads

marker

paint


"Baby Girl" gift card holder card
Designer: Sherry Wright


supplies used:

Making Memories paper (Noteworthy Addie pattern stripe, Ledger Floral)

Making Memories die cuts & ribbon (Noteworthy Addie)

Scor-Pal

Crafty Secrets stamps

Clearsnap fluid chalk ink

Prism cardstock
Zip dry adhesive by Beacon


"Happy Boy" canvas
Designer: Jessica Witty

supplies used:
Patterned paper: Noteworthy Addie Pattern Stripe front & reverse (MM)
Flowers: Noteworthy Blossoms in Addie (MM)

Frame: Noteworthy Glitter Die Cuts (MM)

Tag: Noteworthy Collection Glitter Clears Self Adhesive Die Cuts (MM)
Alphas: Ultra Small & Small Tiny Alphas (MM)

Brads: Metallic Basics circles & mini circles (MM)


"Thank You" card
Designer: Linda Beeson

supplies used:
Solid cardstock
Patterned paper – (note)worthy Addie Ledger Floral and Pattern Stripe/Making Memories
Die Cut Labels/Making Memories
Fluid Chalk stamp pad
Ribbon, brads and rub-on words – Making Memories
Scallop Scissors


"Hi" card
Designer: Miki Benedict

supplies used:
Pattern Paper: Making Memories Noteworthy Addie Brocade Dot, Circle Glitter Dot Die-cut
Stamp: Making Memories Floral foam stamps

Ink: Tim Holtz Old Paper Distress

Tag: Making Memories Noteworthy Addie Glitter Die-cuts

Stickers: Making Memories Noteworthy Delaney Shimmer Alphabet

Ribbon: Making Memories Noteworthy Addie

Jump ring: Making Memories

Tools: EK Success corner rounder


Monogram journal & pen set
Designer: Sherry Wright


supplies used:

Making Memories paper (Noteworthy Addie Ledger Floral)
Making Memories die cits, ribbon, and flowers (Noteworthy Addie)

Small journal and pen (department store)


"Green Jewel" card
Designer: Stacey Stamitoles


supplies used:

Paper: Making Memories Noteworthy Addie (pattern stripe, brocade dot)

Cardstock: WorldWin

Flowers: Making Memories Noteworthy Addie Blossoms (felt & paper)

Tools: Scorpal, sewing machine


"Just Because" card
Designer: Julia Sandvoss

supplies used:
Bazzill Washboard Cardstock
Making Memories Addie Diecut Scallop Paper
Making Memories Addie Journaling Paper
Making Memories Glitter Diecuts
Making Memories Noteworthy Blossom
Colorbox Chalk Inks
Heidi Grace "Greetings" Stamps
Bo Bunny Double Dot Ribbon


"Smile" card
Designer: Miki Benedict

supplies used:
Pattern Paper: Making Memories Noteworthy Addie Ledger Floral, Addie Brocade Dot, Addie Artisan Flower Die-cut
Die-cut sentiment: Making Memories Noteworthy Addie Glitter

Flowers: Making Memories clear Glitter Flowers Bright

Ribbon: Making Memories Noteworthy Addie

Tools: EK Success corner rounder, EK Success scallop scissors, We R Memory Keepers Crop-o-dile
Adhesive: mini dots by Glue Dots


"To My Friend" card
Designer: Julia Sandvoss

supplies used:
Making Memories Delany Floral Paper
Making Memories Addie Diecut Scallop Paper
Making Memories Glitter Diecuts
Making Memories Addie Ribbon
Making Memories Noteworthy Blossom
Making Memories Noteworthy Addie Brad
Colorbox Chalk Inks
Heidi Grace "Greetings" stamp


"Hello" card
Designer: Sherry Wright

supplies used:
Making Memories paper (Noteworthy Addie Ledger Floral)

Making Memories ribbon, die cuts (Noteworthy Addie)
Cornish Heritage Farms stamp

Clearsnap fluid chalk ink
Zip dry adhesive by Beacon

Make sure to come back on Friday for more Making Memories projects that will knock your socks off (or maybe your flip-flops this time of year)!